Building a Model
Start here once you have:
a completed MORPHE2US.xlsx (see Model Components),
time series JSON files under
data/,the parser
MORPHE2US_pipeline.pyin the same folder.
🧰 Step 1: Prepare Your Input Files
MORPHE2US requires two key input files:
1. Excel File (.xlsx)
This file defines:
💡 Technologies (names, efficiencies, costs, emissions)
🧱 Nodes and carriers (e.g., electricity, heat, gas)
📈 Demands and capacity limits
📆 Simulation timeline (years and time slices)
🌍 Geographical zones (if any)
📏 Constraints (e.g., emissions limits)
📌 You can start from a template which can be provided.
2. Time Series File (.json)
This file provides time-dependent data, such as:
Electricity demand profiles
Heat demand
Wind capacity factors
Solar irradiation
Dynamic pricing (if applicable)
📁 Organize your input files like this:
morpheus_project/
├── data/
│ ├── demand_el.json
│ ├── ...
│ └── cf_wind.json
├── MORPHE2US.xlsx        # your Excel inputs
└── MORPHE2US_pipeline.py # the parser
⚙️ Step 2: Generate the Model
Use the MORPHE2US parser script to convert your input files into a Spine Toolbox-compatible database.
🔧 Command
Run the following command from your project root:
python MORPHE2US_pipeline.py --excel MORPHE2US_Scenario_1.xlsx --output output_Scenario_1.json
The –excel and –output parameters aren’t mandatory and are by default replaced by MORPHE2US.xlsx & output.json. When you use the default names, the simple following command can be executed:
python MORPHE2US_pipeline.py
This script:
✅ Validates and parses the Excel/JSON files
🔁 Converts the structure into Spine-compatible format
🧱 Creates a .json database ready to be loaded into Spine Toolbox
💡 You can re-run the parser any time you update your input files.
🧩 Step 3: Load the Model into Spine Toolbox
Now that the .json database has been created, you can open it using Spine Toolbox.
📝 Steps
Launch Spine Toolbox
Create or open a project with at least the following components:
1 Data Store (input SQLite database)
1 Run SpineOpt (optimization engine)
1 Data Store (output SQLite database)
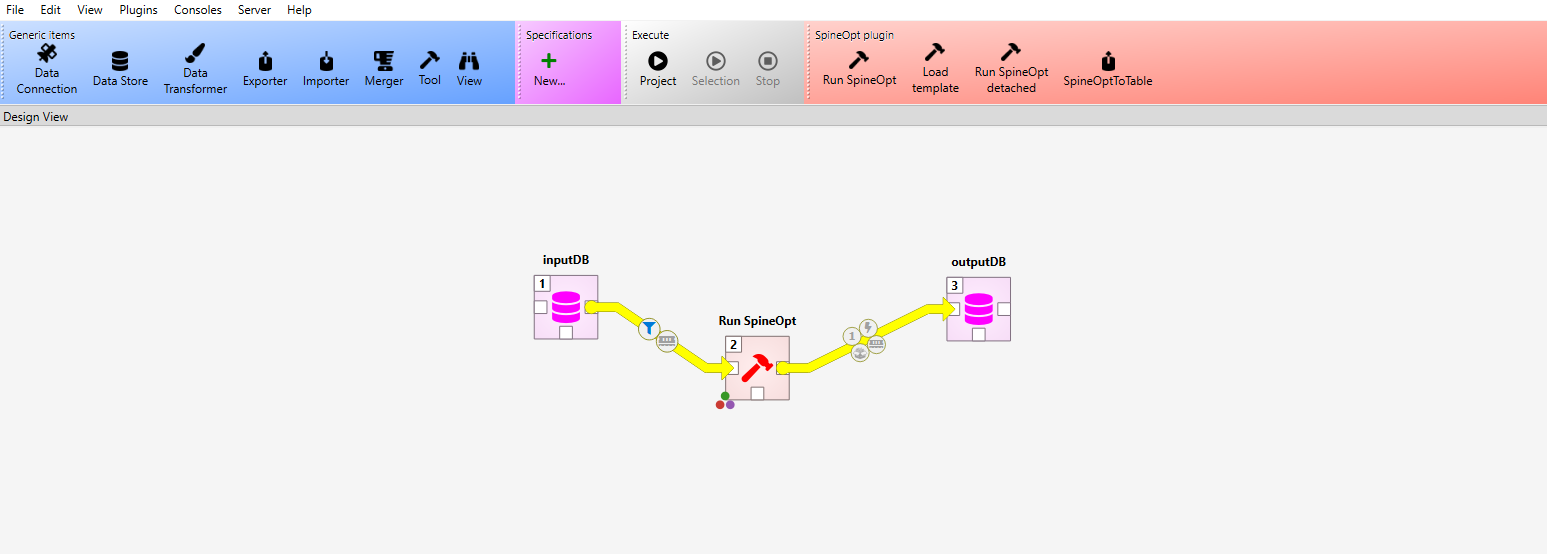
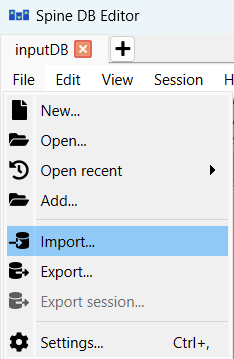
In the input Data Store, use the integrated “Import” function as shown below:
Once the changes have been made to the Data Store, commit them to save.
🔍 Step 4: Verify and Validate
Before running your model in Spine Toolbox, it is crucial to verify and validate the imported data to ensure accuracy and completeness.
📋 What to Check
1. Technologies
Verify that all technologies (e.g., wind turbines, electrolyzers) are correctly listed.
Check that their parameters (e.g., efficiency, costs, emissions) are filled and realistic.
2. Time Series
Ensure that time series data (e.g., demand profiles, capacity factors) match the required resolution (hourly, daily, etc.).
Confirm that the time series aligns with the simulation timeline.
3. Nodes and Carriers
Check that all nodes (e.g., electricity grid, heat network) and carriers (e.g., electricity, hydrogen) are correctly defined.
Validate that connections between nodes are properly established.
4. Parameters
Review key parameters:
Costs (investment, operational)
Efficiencies
Emissions factors
Capacity limits
5. Scenarios and Temporal Layers
Ensure that scenarios (below “Maps” in Spine) are correctly defined.
Verify that years and time slices are properly configured.
✅ Step 5: Ready to Run
Your MORPHE2US model is now fully structured and loaded into Spine Toolbox.
You can now proceed to the next step: